Print Output Settings ( Print Settings )
This is the first of many MicroBiz setup screens that contains several "tabs" at the top of the screen. Each tab is there to separate settings of a certain type.
MicroBiz has numerous invoice formats that may be selected. Some are 40-column invoices (about 3" wide), and some are the traditional 80-column full page (8.5" x 11"). We even have a few of the 80-column half page (8.5" x 5.5") invoice types, these are mostly pre-printed forms.
Some invoices are used for laser printers and others for dot matrix printers. You can use different invoice formats on different workstations. When you set up these parameters, it is for the local workstation only.
Click on the Browse Invoice Type button to see other available invoice types.
- Pre-printed invoices may be purchased from NEBS Corporation. MicroBiz will print invoice information in the appropriate places on the NEBS forms. You can see a list of NEBS forms that are currently supported by MicroBiz by clicking on "Browse Invoice Type". NEBS forms can be ordered by calling NEBS at 800-388-3810. Be sure to mention mail code 95293 when ordering to ensure that you receive MicroBiz-compatible forms.
- Invoices may also be custom designed by MicroBiz for your business. Call us if you would like to discuss a custom designed invoice. For information on customization prices, please contact sales at 800-929-8324.
"Invoice" Tab

Print Invoice Numbers
Toggles the printing of invoice (receipt) numbers on the receipt. If you don't want the invoice numbers on the receipt, be sure to uncheck this option.
Print Heading
Allows your company name and address to be printed at the top of the invoice. Your company name and address can be entered by going to Management, Customize, Shop Name/Ship-To Data. This only applies to some invoice types.
Print Invoices
If you do not want to print an invoice every time you ring a sale, leave this box unchecked. You can still print an invoice by using the reprint feature at the Front Register by typing RP into the SKU box (lower-left). Businesses that have lots of sales but only want to print invoices when customers ask for them should use this feature. RP will print the last completed invoice, even if you have already started another.
Invoice Copies To Print
This controls how many copies of the invoice will print each time you ring a sale by default (not including the additional copies of credit card receipts). You can also easily change this number at the time you complete a sale (F9, then Options).
Always Print Invoices For Credit Card Purchases
If you do not want to print invoices for every sale, you may still want to print receipts for credit card purchases in order to capture the customer's signature. Checking this box will automatically enable the "Print Invoices" option, which you can turn off again.
Print Additional Credit Card Receipt
Turn this on if you would like an additional receipt copy for credit card transactions. This is useful if you will be retaining a signed copy of invoices for credit card transactions, but don't necessarily want extra copies for other tender types. Checking this box will automatically enable the two preceding options, which you can turn off again.
Always Print Invoices For Debit Card Purchases
Same idea as "Always Print Invoices for Credit…", but this setting is for debit card transactions (when the customer enters their 4-digit PIN).
Print Additional Debit Card Receipt
Same idea as "Print Add'l Credit…" but pertaining to debit card receipts.
Print Digital Signature
Some of the receipts/invoices within MicroBiz are capable of printing a captured electronic signature. With this option checked, a signature capture device will be used to capture the signature which is then printed on the selected invoice or receipt template.
Print Notice of Digital Signature
Rather than printing the actual signature, this setting allows you to print a notice that their signature was captured.
Always print invoice as PDF document
This function allows you to print invoices using the PDF programs print control. This is used when your printer is not printing invoices from within the MicroBiz application. This is to be used as a work around when your invoices will not otherwise. All PDF's printed are also saved within the folder set below for reprinting at a later time.
Enter Invoice Number At F9
Most MicroBiz users do not use this feature. This will prompt you to enter an invoice number each time you ring a sale, as opposed to letting MicroBiz assign them in sequence. The system will not allow you to enter an invoice number that has already been used. If you enter any invoice numbers that contain non-numeric characters (e.g. letters, dashes, periods, etc.) you may lose some search and/or reporting features.
- Also keep in mind that the largest invoice number allowed by default is 999999. It is suggested to leave this feature OFF, because when the invoice number exceeds 999999 the system will go into a numeric overflow condition. When this occurs, the system will present numerous error conditions and will require MicroBiz intervention to correct the situation.
- If this happens, please contact MicroBiz support for assistance.
Suppress Zeros For Quantity And Price
This feature leaves the quantity and price blank if they are 0.00. This only applies to some invoice types.
Enter Shipping Information at F9
This will prompt you to enter extra data when you complete a sale from the Front Register. If you are a mail order type business, you will probably want to use it. It will allow you to enter shipping costs and also track the advertising source ("How Heard") from each sale.
Keep Track Of Changes At F6
At the Front Register, the F6 key will allow you to make changes to a line item, such as altering the quantity you are selling or the price you are selling it at. This feature will allow you to print a report, during your daily closeout, that will list what changes were made using the F6 edit feature, and the clerk who made these changes.
Print Kit Components On Invoice/Packing List
This will cause all components of a kit to print on the Front Register and on the invoice whenever the kit is sold. Without this feature checked, only the description of the kit will print. Note that a custom kit automatically prints and includes kit's components.
Enter Miscellaneous Auto Information at F9
This feature is for users of the various Service modules (as opposed to the Standard Retail Module). With this option checked, you will be prompted to enter notes on any services rendered once you click F9 to finish the sale.
The information entered on the screen can be found by loading your customer to the Front Register and clicking Edit/Add to get to the Other Data window.

For more information on configuring and using the Service Modules, see below for the Customize Transaction Settings: "Services" tab.
Print Payment Receipts
This will print a receipt when a customer makes a payment on their account. Note that this feature is available in Business Controller Plus versions only.
Print Waiver on Invoice
If you are using the service module you can select an invoice template with waiver. This will allow a waiver to be printed on the invoice.
Enter Shipvia information at F9
This setting calls a separate type of shipping form during the F9 process. Some of the data entered on this form will print on the invoice/receipt.
Invoice Banner
This message will come up on the bottom of your invoice. If you are using a 40-column invoice, be aware that the message may "wrap-around" if it is over 40 characters. This may be used for advertising a web site, listing your return policy, or simply thanking your customers.
Closeout Printer Is
The two options here are "80-column" and "40-column." Choosing 80-column means you are using a full size printer (8.5" x 11" for example), and 40-column means you are using a small receipt printer. Note that if you select 40-column, you will not have the extended Close Out Reports options available to 80-column report printers. **This can also be modified from the Transaction settings - Misc Tab
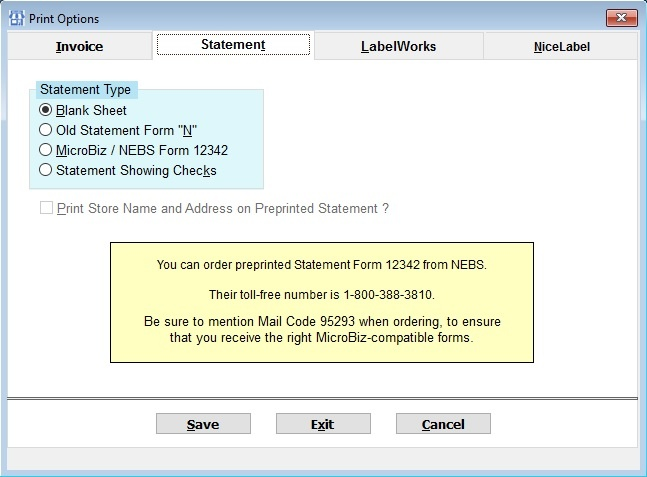
"Statement Tab"
This page allows you to select your statement form preference:
- The MicroBiz standard "Blank Sheet"
- The "Old Statement Form N"
- NEBS form #12342
- Statement Showing Checks
"Labelworks Tab"
These options will allow you to set up MicroBiz to integrate automatically with LabelWorks. LabelWorks is a third-party software package that allows you to create labels for your business. Once set up, MicroBiz will automatically start up LabelWorks whenever you want to print labels. For more information, see
Article 14 - Labels.
"Nicelabel Tab"
NiceLabel integration settings are configured here. For more information, see Chapter 14 - Labels.

Custom System Settings
This section contains the options for tailoring the transaction process to your needs
This setup window contains many tabs, each with many settings that can change the behavior and layout of various MicroBiz features.
"Transactions Tab"

Transactions
Force New Clerk/Password After Each Sale
Each time a sale is completed, the user will have to enter in a name and password before anything else can be done. This is a security feature to make certain that every employee is using their own initials when they ring a sale or make changes. If you have clerks sharing a workstation, you may want this.
Force New Clerk/Password After Each IIP, WIP Or Layaway
You can extend the previous security feature to also apply to IIP/WIPs and Layaways by checking this box.
Always require Customer at F9 Invoice
This option sets a requirement for a customer to be loaded to the register window before you can finalized the sale via F9-Pay.
Loading Items
Warn When Selling On Hand < Sale QTY
This is usually turned off. Mail order businesses who may not see the merchandise at the time they are selling it may want it on. If you have a retail counter and the customer brings the merchandise to the counter to be rung up, this feature is obviously not needed.
Allow Sale of Committed QTY
With this option enabled, the sale of an item may occur even if QTY Committed equals QTY on Hand.
Allow sale when quantity = 0
MicroBiz will allow the sale of an item even if the system shows you have zero on hand. You may encounter negative on hand quantities with this enabled.
Ask For Quantity When Loading SKUs On Invoice
As you sell items or services, the system can "prompt" you for the Quantity. When it prompts, the default will be a quantity of one. If you use a bar code reader and scan all of your saleable items, then you should uncheck this box. When scanning with a bar code reader, it will be time consuming to touch the keyboard in between each item.
Show Item Script When Loading
If you have entered information in the "Item Script" area, this feature will automatically pop it up as the item is scanned. For example, if you were selling printer paper, you might want to put "Ask the customer if he needs ribbons!" in the Item Script, so as to remind the operator to look for the "add-on sale". Or, you might put additional information in the script, that operators can look at if the customer asks for more detailed information.
Enable Item Cost On Blank Line Items
If you sell a "one-time" item, do you want to enter the cost as you sell it? If you do not enter the cost, your profit margins will be too high! From the Front Register, the F10 key allows you to create a blank line sale. It is suggested that you leave this feature enabled and enter a cost when adding F10 items. For more information, see Chapter 5 - The Register Menu.
Use Point & Select For Serial Number Entry
If you are selling "serialized" items, you will need this feature. You may enter serial numbers as you receive the products from your vendor if this box is checked. For more information on serialized items, see
Chapter 6 - Inventory.
Sort Serial Numbers by:
- Age: Allows for the oldest or newest serial number added to be selected first
- Serial Number: Allows for the next number in sequence to be added.
Allow Adding New Serial Number At Time Of Sale
When viewing the list of available serial numbers for a selected serial item at the Front Register, you can add a serial number by clicking the Add button if this option is checked. If unchecked, the Add button will not be enabled from the Front Register, but will still be available under Add/Edit Inventory.
Enable Entry Of Clerk During Invoicing
This will allow you to have multiple sales people earning commission on a single invoice. When you sell an item at the front register, at the time that you are prompted for quantity, you will also be prompted for clerk initials. If using this option, make sure "Ask for Quantity when Loading SKUs on Invoice?" is also enabled.
<QTY> X <SKU> May Be Used At Front Register (I)
If you unchecked "Ask for Quantity when Loading SKUs on Invoice?" you may want to use this feature. This will allow you to type a quantity, then type 'X', and then scan a bar code. You may also type in a quantity, then type x, and then enter a SKU. If you use this feature, you can set a maximum number of digits in <QTY> X <SKU>. For example, if you enter '4', then the maximum quantity you could enter would be 9,999.
Tendering
Allow edit of Clerk in Tender Screen
This options allows for the person at the cash register to edit the clerk that is ringing up the sale. This clerk can be different than the sales clerk. If you enable entry of clerk during invoicing MicroBiz will record each different clerks initials used at each step.
- Retain Original Clerk after sale - This option set's your clerk back to the original clerk that logged in, just in case you share registers.
- No Default Clerk in tender screen - This option removes the clerk that is set to the F9 window which then requires that this be set upon each sale.
Allow edit of Clerk in IIP Entry Screen
When saving an IIP/WIP/LA/QU, you are taken to an Other Entries window where you can save the transaction and even take a deposit if needed. This option will allow the clerks initials on this window to be editable.
Require Customer
With this option you can force MicroBiz to require a customer to be loaded to the front register before you can finalize the sale.
Always Make Change In Cash
This will make it impossible to give change in any tender other than cash.
Seconds To Display Tender Screen after payment
When the cash drawer opens at the completion of a sale, the final sale screen, which displays the change due, will remain visible for the number of seconds entered here. Regardless of this setting, the display can always be cleared by pressing any key on the keyboard.
Save Check Information
A save check data form will be displayed during checkout when this option is enabled and a check is used to pay at the tender screen.
Limit Max Tender To
This allows a business to set a maximum tender amount, such as $10,000.00. This is to assist with theft and accidents placing one too many zero's into the total.
General
Hide Profit / Margin Data On Front Register
If checked, the profit/margin data will not be displayed on the Front Register. If unchecked, when doing a receipt process, as each item is brought to the Front Register the total invoice amount will display the profit that is being made on this particular sale.
Hide Profit Margin Data On Today's Sales
If turned off, you can view Cost, Profit, and Margin by going to the DAILY menu, selecting "TODAY'S SALES", then "SALES FIGURES". If you want your employees to be able to see sales totals for the day, but not the profit or margin, then check this item.
Check Vendor Inventory At Start Up
This will allow you to set up the system to automatically e-mail selected vendors a purchase order based on your re-order levels. The system provides a function for ordering inventory under Inventory, Purchase Orders. For more information on Vendor Inventory, see Chapter 7 - Vendors.
Use Flexible Form When Editing Products
This allows you to specify which fields are visible when you edit an inventory item, instead of using the standard inventory edit screen.
"Taxes Tab"
This section refers to various local/state sales taxes, VAT, GST, PST, etc. At the bottom of this screen there is a table where you can fill out any tax rates applicable.

Use Tax Table (Instead Of Percent)
Some states and countries have a table that sets taxes from $0 to $1000 at one percentage, then switches to another percentage for another range. If you do not have such a tax system, leave this unchecked. If you do need to make use of this, check this box and fill out the table that appears to the right.
Tax By Area? (Class Field In Cust Record)
Some states or countries have tax by counties or parishes. If you live in such an area and must comply with the reporting, you may want to use this feature. The customer's county is entered in the "Class" field in the customer record.
Calculate Tax By Line Item
This method of calculating tax involves adding the tax to each item loaded individually, instead of just the subtotal. Using this method is usually much more accurate, so it is the only option available by default.
If you are upgrading from a previous version of MicroBiz and you had "Calculate Tax On Total" enabled, it will still be checked. However, if you enable "Calculate Tax By Line Item" you will not be able to switch back to "Tax On Total."
Calculate Tax On Total
This is the alternative to calculating taxes by each item individually. This option is included for backwards compatibility and should not be used.
Charge Tax2 On Tax1
Some counties or provinces have a tax that they charge on the total sale PLUS the sales tax. Normally you should leave this unchecked unless it is applicable to your tax laws.
By Default Items Are Taxable For Tax1
Leaving this option checked will let MicroBiz calculate the "Tax1" tax rate on all items by default. Uncheck this if you don't wish MicroBiz to add this automatically.
By Default Items Are Taxable For Tax2
Leaving this option checked will let MicroBiz calculate the "Tax2" tax rate on all items by default. Uncheck this if you don't wish MicroBiz to add this automatically.
Tax Rates Table
This table is used to configure the main part of your tax settings.
- Tax1 Noted as: enter the label (name) you would like to use for the Tax1 setting in the Label field. Enter the tax rate in the second field as a decimal (6.25% would be entered as 0.0625).
- Check the Service and/or Parts check box if you would like tax to be calculated for these fields (applies to this and the Tax2 settings).
- Tax2 Noted as: same as the Tax1 settings.
- You can enable Tax1 and/or Tax2 for each item in the Add/Edit Inventory menu.
- Department/Tax3: in the Label field, enter a Department Code to which you would like to charge an additional "tax." Enter the tax rate in the next field.
- To make use of this feature, make sure you have already set up a Department that you would like to use with this "tax."
- This can be done from the Stock tab when editing an item. For more information see
Chapter 5 - The Register Menu.
- Department/Tax4: the same settings as Tax3 apply here, but Tax4 is just another Department tax you can set up.
"Finance Charges Tab"
This setup screen is where you can enable or disable the use of finance charges (interest on customer accounts) and configure the various settings.

Days To Resolve A Layaway, Days To Resolve An IIP/WIP
Enter the appropriate number days defining each situation. Normally IIP/WIP, being works in progress, are resolved in a very few days. Setting this date will bring to the attention of management an item that is overdue for processing.
Minimum Deposit (Percent As Decimal) – For Layaways Only
This setting defines the percentage of the total that must be deposited at a minimum for Layaways. The figure is entered as a decimal, for example: 0.100 would mean a 10% minimum deposit.
Charge Finance Charges
Check this option if you will be charging finance charges. If not, leave it unchecked and don't worry about the next 3 settings.
If you will be using the Finance Charge feature in MicroBiz, make sure that you enable this option on one workstation only! Select the workstation that will be used for running Customer Statements, and make sure that the Charge Finance Charges option is not enabled on any other PC.
- If more than one workstation have this enabled, they might interfere with each other when calculating the Finance Charges.
Days Grace Period
Enter the number of days before MicroBiz will start calculating Finance Charges.
Day Of Month To Post
Enter the day of the month (date) in which you wish your customers to post payments.
Monthly Finance Charge
Enter your Finance Charge rate here as a decimal representing a percentage. For example: 0.050 would be 5%.
Print Balance Info On Statements
Unchecking this option will suppress printing the previous balance, new balance, etc. on customer statements.
Compound Interest
The system will charge interest upon interest. Check your state laws to see if this is permissible.
Print Invoices With Zero Balances On Statements
The feature provides you with the option of including invoices that have already been paid off when printing customer statements.
"Service Tab"
This tab would only be used if you have a service organization where you need to track the hours that someone spends on a job, you charge a shop fee and have an established labor rate for service. Under this tab, you may also establish a service interval, that is, for repeat service items such as yearly inspections.

Charge Shop Fee
When this box is checked, the program will automatically charge the shop fee that you designate in this section. Percentages must be entered in decimal form (for example, 7% would be entered as 0.07). Also, you can choose to charge Tax1 or Tax2 on the shop fee.
Note Child Record (Unit/Vehicle) As
"Unit" is the default title established in the MicroBiz system. If you would prefer a different term such as "Vehicle", then enter that term here.
Note Technician As
"Technician" is the default title established in the MicroBiz system. If you would prefer a different term such as "Tech", then enter that term here.
Track Actual Hours Spent On Job
Checking this box will cause the program to ask for the hours spent when a job is entered onto the Front Register. This is only for record keeping and it will not affect the cost of a service. If you are charging an hourly rate for services, simply make the price the hourly rate and enter the hours in the quantity field.
Tracking Services With Due Dates
There are four services that you can track regularly in the program. Each time that you complete a sale, you will be prompted for next service due dates. You can run reports to see what services are due for a given date range, and can even print postcards based on these dates, with the customers' names and addresses.
- Name Of Service – You can enter the names of each of the four services here.
- Default Interval (Days) – This is the number of days that the Due Date Screen uses to determine the due date for next service.
- Associated SKU – You can select a SKU to associate with this service. If you do, then each time that you include that SKU on an invoice, the Due Date for this service will be updated. For example, if my service is "Bathe Pet", my default interval is "61", and my Associated SKU is "Bath," then every time that I ring a sale of "Bath", the next Due Date for "Bathe Pet" will automatically be two months (61 days) from now.
To see what services are currently due, go to Reports and then Service Due. By entering today's date, you can see any services that are currently due. Entering another date range will show services that were due within that time frame.
"Miscellaneous Tab"
This setup screen contains some additional transaction settings.

Customer Lookup
Default Order
This pertains to the options available to the user when at the Front Register and selecting their customers. Choosing the Name, Company or Phone would allow the customer list to be presented in that order when pressing F8 on the keyboard or clicking the F8 button with the mouse.
Prompt For Name, Company or Phone
Based on your selection of name, company or phone, placing a check mark here will cause that field will be highlighted for a search when the customer list is presented. Each workstation may be set up separately.
Display Price Level
If you like to see the price level of each customer at F8, set your authorized distributors to price level B. If you need to find a distributor in a particular area, this can be helpful. By placing a check mark here, each time a customer is pulled to the Front Register, their established price level will be presented to the clerk.
- Display Indicator For Purchase Level
See which are your best customers, set a purchase threshold under "Minimum Amount to Trigger Display." If the customer has purchased more than that, a $ will display next to the customer's price level, if you have selected to show their price level.
Product Lookup
Use Customizable Browse
If checked, this allows the user to select the fields available when viewing product information.
Show Cost
This option must be enabled to show the cost column on the product lookup window. You cannot add the field manually via Select Another Function>Add Fields.
Show Price Level on Explode
This allows you to see the available price levels on the Explode form within the product lookup window.
Closeout Options
Synchronize Invoices Before each Closeout
When performing a closeout, the system pulls data from two database files. Prior to running the closeout with this options checked, the system will synchronize the closeout databases to ensure the same amount of invoice records show within each table.
- Bi-Directional Sync
This function will ensure that not only does the product data match in one directly Cash_tra to Invoice but also Invoice to Cash_Tra. Just another double-check of the closeout data.
80-Column / 40-Column
Selecting either option will update your system to print in that type of closeout. An 80-Column closeout will print to 8.5 x 11 sheets of paper and allow you to choose which reports to print at closeout. A 40-Column closeout will print to your Receipt printer usually about a 3-4 inch wide paper. This closeout only allows you to reprint the last closeout, Sales Summary Report, Sales by Department Report, along with the Ins/Outs.
Note Clerk As
This option allows you to setup your default name for the clerk or technician or representative that will work with your customers.
When Filling Backorders items are initially Selected
This allows you to modify how you fill backorders. When checked and using the Fill option at the front register, your items are automatically selected for you so you do not need to select each item that you wish to fill.
Workscreen
Appearance:
Maximize Front Register
Often a business will only be setup to work with the application MicroBiz on their PC and nothing more. To help deter the use of other Windows functions, you can maximize the Front Register so that the taskbar and start buttons within Windows are not available.
Show Buttons with Pictures
This function enables or disables the pictures on the Front Register buttons.
Display Clock on Front Register
Enabling this option places a digital time clock on the Front Register.
Front Register Font Size
The default font size is 14 on the Front Register, and is available to modify between sizes 7 through 22.
Behavior:
Pop-Up Items When Front Register Grid Is Clicked
If this option is turned on you can open the Product Lookup window (normally accessed by clicking or pressing F3 on your keyboard) simply by clicking on the main "grid" portion of the Front Register.
Customer:
Show Customer Balance On Front Register
Check this box if you would like a customer's balance due amount to be reflected on the Front Register each time a customer is loaded.
Recalculate Customer Balance Due When Loading
Checking this option will cause MicroBiz to update the customer's balance information every time a customer is loaded. This helps keep the balance due information accurate.
Clear customer after each payment posting
If unchecked, MicroBiz will no longer close the Post window after posting a payment.
Allow Reset Of Invoice Number
If you want to reset your invoice number - do so, but be careful. The MicroBiz system automatically assigns sequential invoice numbers. This box should never be checked unless you have a positive control over your invoice assignment processes. You may seriously damage your system if you try to apply your own invoice numbers without proper control.
Some business owners like to increase their invoice number each month, so their clients will think they are much busier. The maximum invoice number in MicroBiz is 999,999,999.
Beginning with v15.5.4, all required databases have been updated to allow for a 7 digit invoice number. This can result in previous invoices stored prior to updating to v15.5.4, or future versions, to no longer be available for re-printing however these invoices will still show in your system. To allow for reprinting of these invoices, call into MicroBiz Technical Support for an Invoice Expansion.
"Security Tab"
This setup screen contains the Command Window, as well as some general security settings.

Validate Clerk's Initials
The program always asks for initials when entering the Front Register. If this box is checked, the program will check the entered initials against the employee list. If the initials are not in the employee list then you will not be able to access the Front Register.
Carry Security Level Through After Initial Signon
If this box is checked, the program will ask you for a user name and password as soon as you enter the program. It will then let you into password protected areas without putting up a password screen, if you have a high enough security level to get into those areas. If the security level of a function is a smaller number than the user's security level, the program will ask for a password, even if "Carry Security Level Through" is checked.
Force New Clerk/Password after each sale?
This allows for a merchant to have a remote station requiring a user/pass to begin a new sale. Walkerbys cannot simply open the front register screen without a valid username and password.
New Clerk/Password after each IIP/Layaway
This option is the same as the option above however it works for the IIP/WIP/LA other entries window.
Always Require Customer At F9 Invoice
Check this option if you want all MicroBiz users to be forced to load a customer before ringing anything up. With this option unchecked, you can still load a customer to the Front Register, but it will not be required in most cases.
Split Add/Edit Security To Add And Edit
Checking this box will create a Security Level setting for the ability to edit products.
Command Window
Brings you to the Visual FoxPro Command Window as shown below. In this window, you can perform various FoxPro commands and view the databases used in the program. This option will only prove useful to those knowledgeable in the workings of Visual FoxPro. Making changes to the structure of MicroBiz database formats can render your system inoperable.
The command window should always be used with caution! It can be a very powerful tool for good OR ill, depending on how it is used. Make sure to back up your data before making any serious changes to your data from here!

In addition, since changes to the databases can be made from this window, it is highly recommended that this option be password protected with a high level of security. You can browse the fields in a DBF table by going to the Command Window and typing:
CLOSE DATA ALL <ENTER>
USE FILENAME.DBF <ENTER>
BROWSE <ENTER>
<Esc Key to close the Window>
CLOSE DATA ALL <enter>
EXIT <enter>
You can also modify certain invoices and reports from the Command Window. It is strongly recommended that you make a backup before using the Command Window, as a single keystroke can alter your data.
"Pricing Tab"
Profit margins, price schemes and some other settings regarding how MicroBiz handles your prices are all set up here.

Automatically Set Prices To Match Margins
When this box is checked, the program will automatically calculate the prices for different levels based on the cost of the product and on the margin that you set in the table found in this area. Please note that this may require several tests upon the part of the user to establish the appropriate price increase based on margins desired.
Recalculate Price From Margin On Receive
Uncheck this option if you want to establish your prices based on the margins based on the original data entered. With this option enabled, MicroBiz will recalculate the prices based on updated cost info upon receiving more of an item.
When Loading IIPs, Update Prices Based On Current Product Prices AND
When Loading Quotes, Update Prices Based On Current Product Prices
When loading IIPs or Quotes, update prices based on current product prices. If you keep Quotes or IIP's in your system for any length of time, your product prices may change. This feature will automatically check the prices of the items of a Quote or IIP and update them if they have changed. You can set a grace period for this feature, so that a customer has 30 days, 90 days, etc. to buy at the quoted price regardless of price changes.
When Loading IIPs, Update Cost Based On Current Product Cost
Same idea as above, but this applies to the item's cost. This is a good feature to use in conjunction with the previous one, as it will help keep your profit margins accurate.
Price Item Rounding
When a price changes you can have the last or last two digits rounded automatically. You can also opt for no rounding at all which is the default selection. To give you an example, lets say that you keep a 30% margin on your products, and a particular items cost just increased. Your price can be updated as well simply by setting your rounding preference and amount within the space provided. With the last two digits, you can do the same thing however this updates both of the decimals within the price.
Minimum Markup %
This setting allows you to ensure your cost and price will have a minimum profit value.
Customer Discounts
Discount from Suggested List Price
If you provide a discount at the front register and are not selling to a customer on a alternative price level, then you want to discount from the suggested list price.
- Use Price Level if Lower - Select this option if you have customers on different pricing tiers and their discount could be greater by that price level alone.
Discount from Customer Price Level
Use this option if you have the majority of your customers on a particular price level. *Wholesale Pricing w/Retail
- Apply Discount to all Customer Levels - Select this option if you would like to provide a discount regardless of the customer level.
Show/Report Discounts from Suggested List Price
This setting is much like the above. Invoice/Receipt discounts showing how much is saved will report based on the Suggested list when this is checked.
Recalculate Prices Based on Customer
This setting allows for you to load a customer to the front register and have the prices for items already loaded to the register recalculate based on settings within the customers file. Settings such as Tax Exempt, or Price Level, or Customer Discounts.
Do Not Recalculate Manually Entered Prices
Sometimes you manually enter a price onto the front register that you want to remain as is. With this option checked, your price will remain the price you entered.
Enable Price Schemes Mix & Match
Items with both promo and price schemes assigned to them can cause the total to calculate incorrectly when loaded to the Front Register with other items that are also assigned to the same price schemes. If you notice this is a problem, enabling this option should fix this for you. You can also select the Add/Edit Price Scheme button to setup unique schemes to add product to.
Enable SKU Consolidation
With this option enabled, multiple quantities of an item will only take up one line on the Front Register (and therefore, if edited, will all share the same properties). If you would like every item to appear as a separate line (and be able to edit each item individually), regardless of how many items are loaded, then you should disable this feature.
"Tenders Tab"
The tenders tab allows for you to setup your desired Tenders available at F9.

You can call for the cash drawer to open for each tender type, or require a signature. You can also require a customer be present to accept Checks and/or Credit Cards as well as any of the other tenders, however a customer will always be required for Charge To Account and Store Credits. Not enough tender types? There is a section where you can setup up to 3 different custom tender types.
"International Tab"

ZIP/Postal Code Format
The default setting after initially installing for ZIP code format is "other". Here you can set your ZIP code format and expand the database field from 5 characters to as many characters as needed.
Credit Card Setting
Change your credit card settings based on where you do business.
Enable Multi-Currency
This allows you to elect a primary currency and a secondary currency as payment tender. This would be applicable if, for instance, a company in Argentina has it's primary currency (Pesos) set as the number one choice and also accepted U.S. Dollars as it's secondary tender. The system would automatically use a conversion table to allow use of both types of tender. The conversion table can be configured by clicking the Currencies button on this screen.
To set up the Multi-Currency capability, place a check mark in the "Enable Multi-Currency" box. This opens the process to set up your desired Multi-Currency formula. Using our example of Argentina, select the Argentine Pesos as the "Home Currency" by clicking on the number "1" button and selecting Argentina. The "Home Currency" option specifies the MicroBiz default currency. Changing this setting will effect how all prices, costs, etc. will be displayed in your system.
If a currency other than the U.S. Dollar is set as the Home Currency, all inventory items must be priced (cost and retail) as this tender type.
Select the "Default Tender 1" currency as the first accepted form of payment. This should almost always be the same setting as the Home Currency. At the present time the system will only handle two forms of tender for payment purposes.
If you need to change to a different tender for payment at the end of a sale, press the space bar on the keyboard to bring forth the screen for changing to the "Default Tender 1" tender type.
If Multi-Currency is being used within the system, at the time of closing the sale (receipt), both types of tender may be accepted for payment. A partial payment may be made in the Default Tender 1 Currency and the balance in the Default Tender 2. Currency conversion is automatic and the conversion rate is displayed on the receipt process window.
"Module Tab"
This setup window contains the various settings used to manage the "Gas Module." Only change these settings if you are using a Service module and use MicroBiz to sell gas. To sell gas from the Front Register, type G in the SKU box.

Print Gas Invoice
If you disable this feature then you won't be able to print invoices for gas transactions, unless you enable Enter Gas on Work Orders as well.
Print Headings On Gas Invoice
Leave this on if you want your company information to appear as a "header" on the gas invoice.
Number Of Lines To Feed After Gas Invoice
You can change this figure if you desire more or less space on your gas receipt.
Do Gas Closeout After Regular Closeout
By default, your gas sales will be included with everything else when you process your Closeout. If you check this box then your gas sales will be separate, and you will do a separate Closeout once your regular Closeout is complete.
Enter Price & Quantity When Selling Gas
If left unchecked, you will simply enter the total price for the gas sale. If you would like to enter a gas price and gallons purchased (so MicroBiz will calculate the total for you), then enable this option.
Enter Gallons On Gas Receipts
Similar to the above feature.
Enter Gas On Work Orders
Check this box if you would like the option to load gas sales to your regular Front Register. Beware that gas sales on the Front Register may accidentally be charged tax!
"Random Weights Tab"
The Random Weights feature enables use and setup of composite barcodes, which can be used in conjunction with scales that print barcode labels with specific SKU and price/weight information.

Enable Random Weight UPC (12 digits)
The checkbox here allows you to toggle this feature on/off. The 12-digit composite UPC can be used with barcode labels that have already calculated the price, using the following syntax and steps:
- Create a default 12 digit SKU in MicroBiz. The price entered on this SKU should be the price per unit (for example $2.00 if $2.00 per pound):
- Syntax: p#####00000, Example: 20000100000.
- In the example above, 2= check digit, 00001 = PLU code, 00000 = (syntax which must be added to work).
- You will need a scale which will calculate the price based on weight measurement. Here is an example of what the barcode format which the scale will print out:
- Syntax: p#####s$$$$c, Example: 200001807541
- In the example above, 2= Prefix, 00001= PLU Code, 8= Secondary Check Digit, 0754 = Price ($7.54 in this example), 1= Check Digit.
- Keying or scanning this barcode will pull up the SKU as entered in MicroBiz (20000100000) with the assigned price as printed out by the barcode provided by the scale ($7.54 in the example). MicroBiz will calculate the weight (QTY) based on the SKU and extended price (3.77 pounds using our example above).
Enable Random Weight EAN (13 digits)
This checkbox toggles the EAN composite barcodes on/off. The 13-digit composite EAN can be used with barcode labels that have already calculated the price or weight, using the following syntax and steps:
Barcode if printed by Price:
- Create a default 13 digit SKU in MicroBiz. The price entered on this SKU should be the price per unit (for example $2.00 if $2.00 per pound):
- Syntax: pp######$$$$$c, Example: 020000200000
- In the example aboce, 02= Prefix, 000002 = PLU Code, 00000 = (syntax which must be added to work).
- You will need a scale which will calculate the price based on weight measurement. Here is an example of what the barcode format which the scale will print out:
- Syntax: pp#####$$$$$c, Example: 0200002023451
- In the example above, 02 = Prefix, 000002 = PLU Code, 02345 = Price ($23.45 in this example), 1 = Check Digit.
- Keying or scanning this barcode will pull up the SKU as entered in MicroBiz (020000200000) with the assigned price as printed out by the barcode provided by the scale ($23.45 in the example).
Barcode if printed by Weight:
- Create a default 12 digit SKU in MicroBiz. The price entered on this SKU should be the price per unit (for example $2.00 if $2.00 per pound). The price entered here is important because MicroBiz will calculate the price based on the unit measurement calculated and printed on the barcode by the scale:
- Syntax: pp#####00000, Example: 210000300000
- In the example above, 21= Prefix, 00003 = PLU Code, 00000 = (syntax which must be added to work).
- You will need a scale which will calculate the weight. Here is an example of what the barcode format, which the scale will print out:
- Syntax: pp#####wwwwwc, Example: 2100003002341
- In the example above, 21= Prefix, 00003 = PLU Code, 00234 = Unit Measurement (2.34 units in the example), 1 = Check Digit.
- Keying or scanning this barcode will pull up the SKU as entered in MicroBiz (210000300000) with the assigned units as provided by the scale barcode (2.34 units in the example). MicroBiz will calculate the price by multiplying the amount of units by the price entered for the product in "Add/Edit Inventory."